Sunday, May 1, 2011

30th April 2011 - More axle stuff

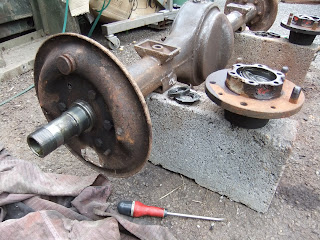
Over the last couple of days I've painted the axle and components with the now familiar combination of primer and top-coat.


The undercoat "cures" really quickly so it's great to work with. The weather has been lovely this week so I was able to get the primer done one day and the top coat done the next.


My box of bits and pieces arrived in the post, so today I was able to crack on with the assembly.


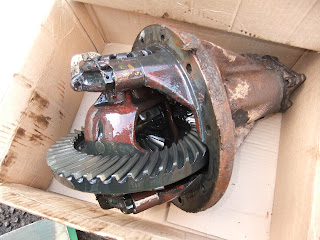
A new gasket and on with the diff. You can probably see that I've not cleaned and painted the plate that bolts to the prop-shaft. The simple reason being that I have a new seal to go in the "nose" of the diff and it is easier to replace this with the axle assembled. So when it's all back together, I'll whip that end piece off, replace the seal, and paint the plate up before replacing it.


Brake back plates on. These had really heavy surface rust on them, but cleaned up they look good to go for another forty years (maybe)!


You may recall I mentioned that the bearings were in excellent condition. So I took the decision not to replace them. I cleaned them thoroughly, then packed them with fresh grease and installed a new seal into each hub.


Hubs loosely assembled on axle - it's easiest to adjust the bearing "float" with a wheel installed, so I'll do that before installing the half-shafts.


You can see the brake cylinder installed. Here's the rest of the brake components in position.


The brake adjuster mechanism was a bit of challenge! I bought a pair of new ones which came with, let's call them "comprehensive" fitting instructions. The installation of the adjuster appears to be different for petrol engines, diesel engines, 6 cylinder engines, long wheelbase, short wheelbase, and so on. I think there were six different variations - none of which looked the same as the adjusters that I had removed. In the end, I found a configuration which suited Pod and they seem to work fine.

And finally (for now) the brake drums installed.


The more observant will notice that there are a few wheel studs missing! When I took the wheels off (all those months ago) several studs came out rather than the wheel nuts undoing. I ordered a handful of new ones which came in my box of spares - but they're the wrong ones. Doh! So I'll dig out the original wheel nuts and see if I can remove the studs without damaging them.

So there's still a few jobs to do on the rear axle before I can say it's complete - wheel bearings, wheel studs, diff seal and brake lines. Then I should be able to fill it up with oil and wrap it up, ready for installation...

Tuesday, April 26, 2011

26th April 2011 - Hubs off

I popped over to Keith Gott Land Rovers this morning and bought another one of these...


The very wonderful Land Rover hub nut spanner.

Two minutes work and the hubs are off. The bearings are in perfect condition - nice OE quality Timken bearings, properly adjusted and without a sign of wear. I'm inclined to leave them alone for the rebuild.


A final run over with the wire brush and the axle is ready for paint!

Sunday, April 24, 2011

24th April 2011 - Will the rot ever end?

Well, I finished my last post with a photo of the rot in the strengthening gusset under the rear axle. I wasn't sure what the approach should be here, so I asked the very knowledgeable folk on the Series 2 club forum. The response was unanimous - if it looked that bad on the outside, the inside would be a lot worse, so it'd have to come off. In severe cases the rust will have attacked the axle casing itself requiring even more repair work.

So today I went through several cutting discs with my trusty angle grinder, and cut through the strengthener. Look what was inside...


I was obviously concerned at this point as I feared the worse for the axle casing. So I pressed on and ground back the surface using a grinding disc and then my favoured wire brush.


It looks like I've been lucky and caught it in time - although there was a lot of surface rust, there is decent metal underneath. I have the option of fabricating a new strengthener out of sheet steel - certainly if I was planning to do much off-roading with Pod I would do so. But given that Pod is likely to lead a fairly easy life once he's back on the road, I don't think the strengthener will be necessary. The only other minor concern I have is that all this rust followed by some fairly drastic grinding will have reduced the thickness of the metal. Without cutting through it I can't possibly tell, so I think it's one of those things I'll have to take a chance on. If the axle bends the first time I hit a bump in the road - I'll know I should have added the strengthener!

Friday, April 22, 2011

22nd April 2011 - Ups and downs

The plan today was to remove the chassis suspension bushes, as these are all that's preventing me from cleaning/waxing/painting the chassis. After 3 very hot, sweaty, frustrating hours, I still hadn't got one out! I was thoroughly demoralised. I do have a new plan of action, but I'd really had enough by early afternoon, so decided to do something else... I started stripping down the rear axle.

Here it is, pretty much as it looked when it was removed from Pod.


First things first, degrease and wash!


Next remove the brakes and the half-shafts - all good so far!


Doh! It was all going so well - I was convinced I had a hub nut spanner but could I find it? Er... no. So the hubs will have to stay there until I get a new spanner. So the last job was to remove the differential.


The oil that was in there didn't look too bad, which bodes well. And if you ever wondered what a Land Rover rear diff looks like, here's one...


The manual pretty much says there are no user-serviceable parts in here, so I think it'll just be a case of cleaning the casing and painting it, then reinstalling it.

The only downer was finding yet more rot! This time in the strengthening gusset on the rear axle. Early Series 2's didn't have this, but it was added to provide more rigidity to the axle when off-roading. Unfortunately, like the chassis, it's a rust magnet - I'll need to cut out the rotten sections and weld new metal in. Glad I have a decent welding machine now!


As I said earlier, I've got a new plan for removal of the chassis bushes - a trip to Screwfix is in order first. I'll update on that next time!

Saturday, April 16, 2011

16th April 2011 - Chassis repairs

So far I've discovered 3 holes in the chassis.

The rear nearside axle bump-stop, the nearside bulkhead outrigger, and the front of the nearside dumb-iron.


Somehow I forgot to take a picture of the bumpstop rot before the repair. Sorry!

The bumpstop area was the first part I started on. The first attempt blew holes in the chassis either side of the hole I'd made so I had to cut a bit more out to get back to decent metal.


Learning from my first attempt, I cut a lot more metal out on the outrigger to remove all the really thin stuff.


And finally the front dumb-iron. I thought it was just the front square section that was rotten, but when I cut that out I discovered that the sides and the bottom were also rusted through. It is possible to buy new dumb-irons, but I decided this was still salvageable.


I appreciate that my welding isn't the prettiest! But painted up it'll look okay - and who looks that closely at a chassis anyway???

As it stands, I don't think there's any more repair work need on the chassis. The only thing I still need to do is replace the suspension bushes - a job I'm really not looking forward to.

I think I'm going to need a few more wire brushes before the chassis is finished though...

Monday, April 11, 2011

10th April - Clean machine

Not a huge amount accomplished today (the weather was fabulous, and I was invited out green-laning in my other Land Rover - it seemed rude to say "no").

However, I managed to buy a big bottle of degreaser and painted the chassis with it. With a bit of elbow-grease and my trusty pressure washer, I've got the chassis looking pretty clean. It still has some paint on it in places, but the majority of it is bare metal with a healthy coat of rust.

So the next job is to start on the repair work - woooohooo! I get to use my MIG welder again!

Saturday, April 9, 2011

9th April 2011 - Hiatus over!

How did it suddenly become April???

Well, I guess it's pretty obvious that work on Pod stopped over the winter. It was so cold outside I just couldn't find the enthusiasm to spend more than a few minutes at a time in the garage. Once the weather started to improve I found hundreds of jobs to do on the other Land Rover (aka "Mortimer") and before I knew it, we were into the fourth month of the year!

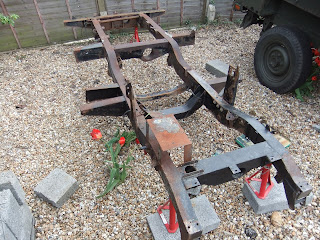
Today I decided I had to get back into the swing of things, so I finished stripping the chassis. There were a few bit still attached such as the handbrake, the brake pipes, the engine and gearbox mounts, and the towbar. I had to resort to the angle grinder to remove every one of those items!

With the chassis finally completely "naked" I attacked it with the pressure washer. I just wanted to blast off any loose dirt and really flaky paint. The next step will be to degrease it, especially around the engine and gearbox crossmembers, before preparing it for painting.

I inspected the chassis to see how much repair work will be required. For a 41 year old, it's doing remarkably well. So far I've found a small section on the front of the nearside dumb-iron, a hole in the nearside bulkhead outrigger, and a hole in the bottom of the chassis rail under the nearside axle bump-stop. The rear crossmember has been replaced at some point, so although it has plenty of surface rust (like the rest of the chassis) it's good and strong.

No pictures today - I'll add some of the chassis when the repair work starts. I just hope it's not another 3 months between posts...